Flutter公式のLayout Tutorialを実践
イントロダクション
Flutterの練習にチュートリアルを実行しました。 公式Tutorialを参考にしていきます。 今回は、Layout Tutorialを実践しました。
前回までの記事は以下。
目次
- イントロダクション
- 目次
- 環境
- Step 0: Create the app base code
- Step 1: Diagram the layout
- Step 2: Implement the title row
- Step 3: Implement the button row
- Step 4: Implement the text section
- Step 5: Implement the image section
- Step 6: Final touch
- まとめ
- 参考サイト
環境
- PC : macbook Air (2015 early)
- OS : macOS Mojave(10.14.5)
- Flutter : 1.5.4
- Dart : 2.3.0
デバックはAndroid実機で行いました。
Step 0: Create the app base code
アプリ開発の準備をします。
flutter create test01
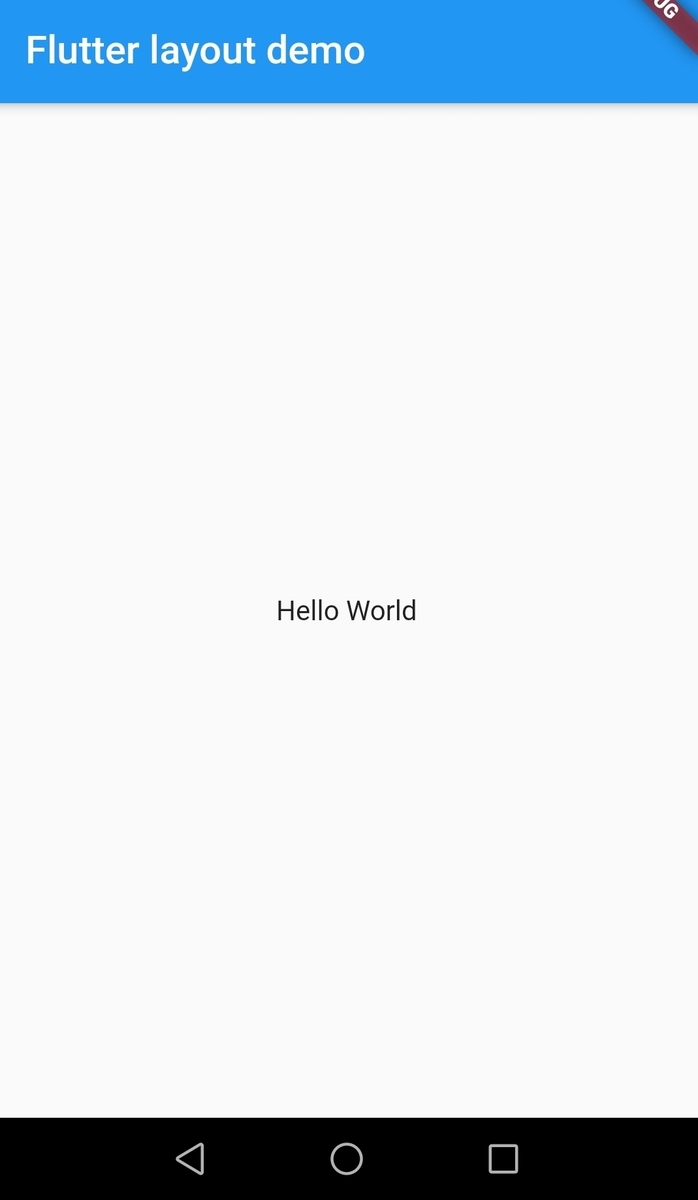
main.dartを以下のように書き換え。
import 'package:flutter/material.dart';

void main() => runApp(MyApp());

class MyApp extends StatelessWidget {
  @override
  Widget build(BuildContext context) {
    return MaterialApp(
      title: 'Flutter layout demo',
      home: Scaffold(
        appBar: AppBar(
          title: Text('Flutter layout demo'),
        ),
        body: Center(
          child: Text('Hello World'),
        ),
      ),
    );
  }
}
Step 1: Diagram the layout
step1はレイアウトについての説明です。
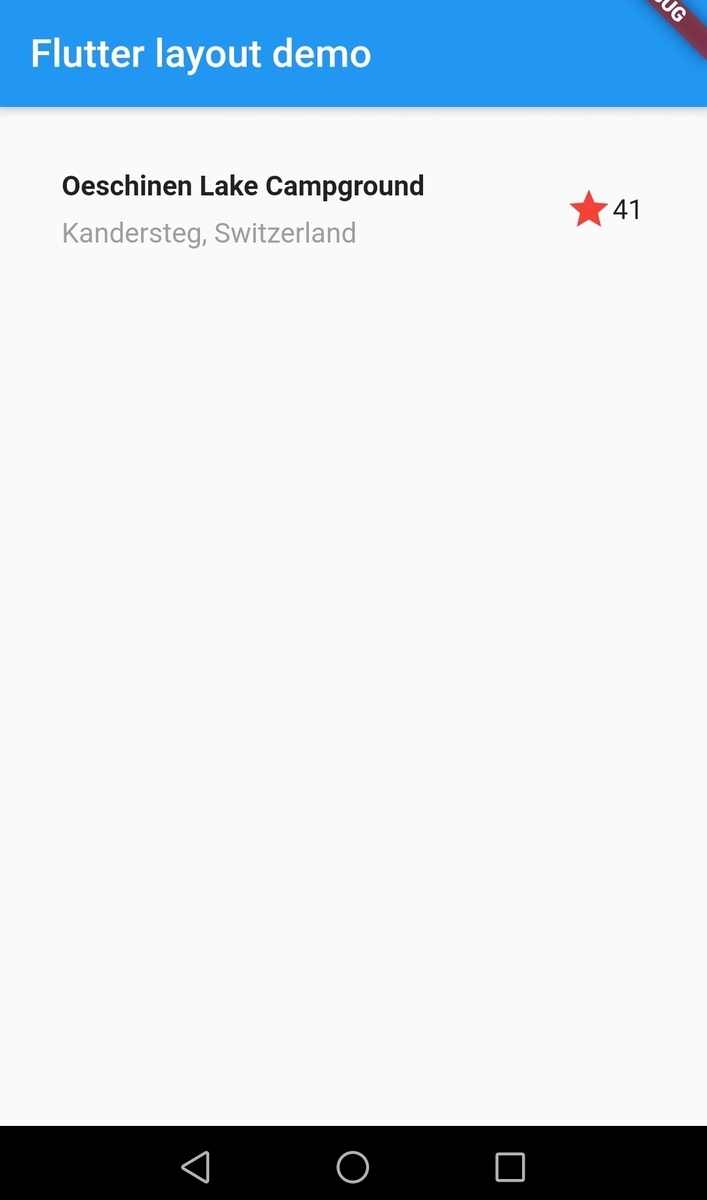
Step 2: Implement the title row
新しいウィジェットを追加します。
Widget titleSectionを先程のコードに追加します。
そして、MyAppクラスのbodyの項目を書き換えます。
以下は変更後のコード。
import 'package:flutter/material.dart';

void main() => runApp(MyApp());

class MyApp extends StatelessWidget {
  @override
  Widget build(BuildContext context) {
    // 追加
    Widget titleSection = Container(
      padding: const EdgeInsets.all(32),
      child: Row(
        children: [
          Expanded(
            child: Column(
              crossAxisAlignment: CrossAxisAlignment.start,
              children: [
                Container(
                  padding: const EdgeInsets.only(bottom: 8),
                  child: Text(
                    'Oeschinen Lake Campground',
                    style: TextStyle(
                      fontWeight: FontWeight.bold,
                    ),
                  ),
                ),
                Text(
                  'Kandersteg, Switzerland',
                  style: TextStyle(
                    color: Colors.grey[500],
                  ),
                ),
              ],
            ),
          ),
          Icon(
            Icons.star,
            color: Colors.red[500],
          ),
          Text('41'),
        ],
      ),
    );

    return MaterialApp(
      title: 'Flutter layout demo',
      home: Scaffold(
        appBar: AppBar(
          title: Text('Flutter layout demo'),
        ),
        body: Column( // 変更
          children: [
          titleSection,
          ]
        )
      ),
    );
  }
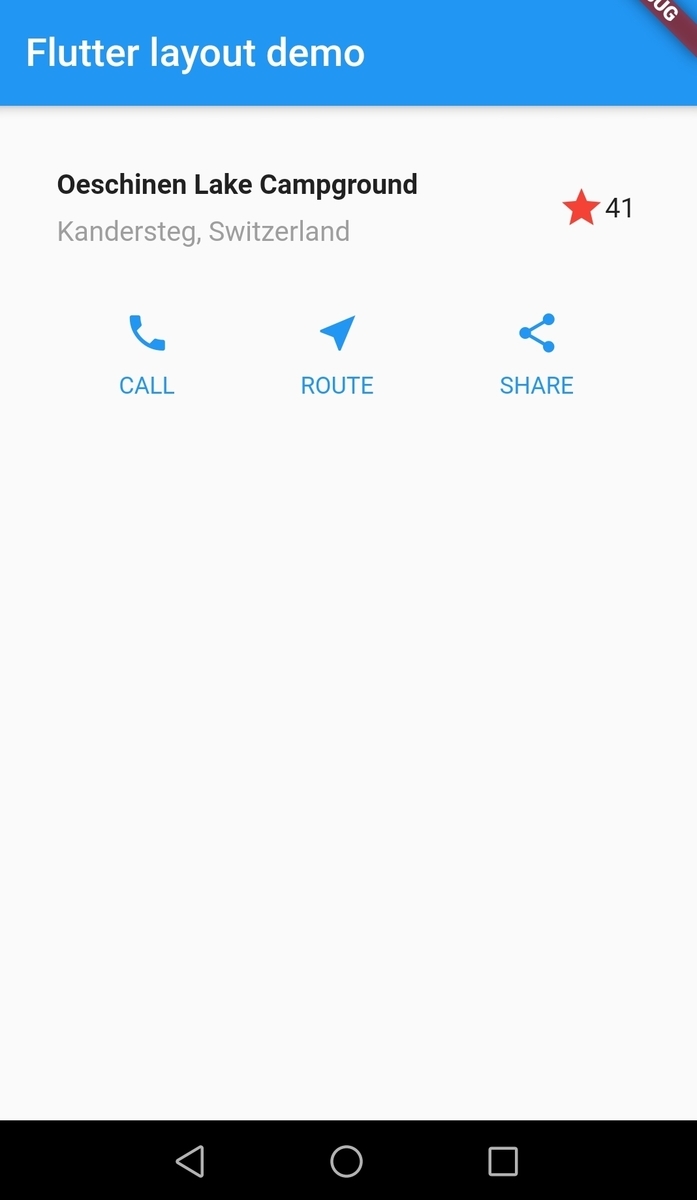
Step 3: Implement the button row
マテリアルデザインのアイコンを入れます。
_buildButtonColumnを新たに追記し、titleSectionの直後に新しいウィジェットを追加します。そして、bodyの項目を変更します。
import 'package:flutter/material.dart';

void main() => runApp(MyApp());

class MyApp extends StatelessWidget {
  @override
  Widget build(BuildContext context) {
    Widget titleSection = Container(
      padding: const EdgeInsets.all(32),
      child: Row(
        children: [
          Expanded(
            child: Column(
              crossAxisAlignment: CrossAxisAlignment.start,
              children: [
                Container(
                  padding: const EdgeInsets.only(bottom: 8),
                  child: Text(
                    'Oeschinen Lake Campground',
                    style: TextStyle(
                      fontWeight: FontWeight.bold,
                    ),
                  ),
                ),
                Text(
                  'Kandersteg, Switzerland',
                  style: TextStyle(
                    color: Colors.grey[500],
                  ),
                ),
              ],
            ),
          ),
          Icon(
            Icons.star,
            color: Colors.red[500],
          ),
          Text('41'),
        ],
      ),
    );

    // 追加
    Color color = Theme.of(context).primaryColor;
    Widget buttonSection = Container(
      child: Row(
        mainAxisAlignment: MainAxisAlignment.spaceEvenly,
        children: [
          _buildButtonColumn(color, Icons.call, 'CALL'),
          _buildButtonColumn(color, Icons.near_me, 'ROUTE'),
          _buildButtonColumn(color, Icons.share, 'SHARE'),
        ],
      ),
    );

    return MaterialApp(
      title: 'Flutter layout demo',
      home: Scaffold(
        appBar: AppBar(
          title: Text('Flutter layout demo'),
        ),
        body: Column(
          children: [
          titleSection,
          buttonSection, // 追加
          ]
        )
      ),
    );
  }

  Column _buildButtonColumn(Color color, IconData icon, String label) {
    return Column(
      mainAxisSize: MainAxisSize.min,
      mainAxisAlignment: MainAxisAlignment.center,
      children: [
        Icon(icon, color: color),
        Container(
          margin: const EdgeInsets.only(top: 8),
          child: Text(
            label,
            style: TextStyle(
              fontSize: 12,
              fontWeight: FontWeight.w400,
              color: color,
            ),
          ),
        ),
      ],
    );
  }
}
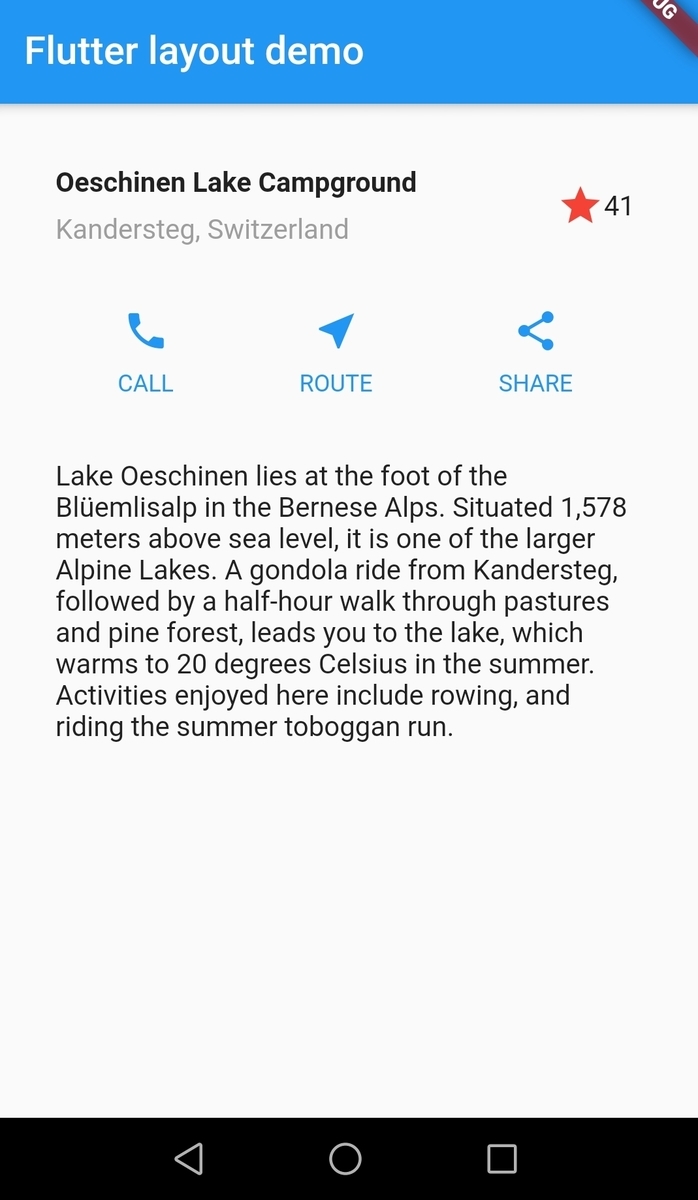
Step 4: Implement the text section
説明用のウィジェットを追加します。
textSectionを新たに追記し、bodyを変更します。
import 'package:flutter/material.dart';

void main() => runApp(MyApp());

class MyApp extends StatelessWidget {
  @override
  Widget build(BuildContext context) {
    Widget titleSection = Container(
      padding: const EdgeInsets.all(32),
      child: Row(
        children: [
          Expanded(
            child: Column(
              crossAxisAlignment: CrossAxisAlignment.start,
              children: [
                Container(
                  padding: const EdgeInsets.only(bottom: 8),
                  child: Text(
                    'Oeschinen Lake Campground',
                    style: TextStyle(
                      fontWeight: FontWeight.bold,
                    ),
                  ),
                ),
                Text(
                  'Kandersteg, Switzerland',
                  style: TextStyle(
                    color: Colors.grey[500],
                  ),
                ),
              ],
            ),
          ),
          Icon(
            Icons.star,
            color: Colors.red[500],
          ),
          Text('41'),
        ],
      ),
    );

    Color color = Theme.of(context).primaryColor;
    Widget buttonSection = Container(
      child: Row(
        mainAxisAlignment: MainAxisAlignment.spaceEvenly,
        children: [
          _buildButtonColumn(color, Icons.call, 'CALL'),
          _buildButtonColumn(color, Icons.near_me, 'ROUTE'),
          _buildButtonColumn(color, Icons.share, 'SHARE'),
        ],
      ),
    );

    // 追加
    Widget textSection = Container(
      padding: const EdgeInsets.all(32),
      child: Text(
        'Lake Oeschinen lies at the foot of the Blüemlisalp in the Bernese '
            'Alps. Situated 1,578 meters above sea level, it is one of the '
            'larger Alpine Lakes. A gondola ride from Kandersteg, followed by a '
            'half-hour walk through pastures and pine forest, leads you to the '
            'lake, which warms to 20 degrees Celsius in the summer. Activities '
            'enjoyed here include rowing, and riding the summer toboggan run.',
        softWrap: true,
      ),
    );

    return MaterialApp(
      title: 'Flutter layout demo',
      home: Scaffold(
        appBar: AppBar(
          title: Text('Flutter layout demo'),
        ),
        body: Column(
          children: [
          titleSection,
          buttonSection,
          textSection, // 追加
          ]
        )
      ),
    );
  }

  Column _buildButtonColumn(Color color, IconData icon, String label) {
    return Column(
      mainAxisSize: MainAxisSize.min,
      mainAxisAlignment: MainAxisAlignment.center,
      children: [
        Icon(icon, color: color),
        Container(
          margin: const EdgeInsets.only(top: 8),
          child: Text(
            label,
            style: TextStyle(
              fontSize: 12,
              fontWeight: FontWeight.w400,
              color: color,
            ),
          ),
        ),
      ],
    );
  }
}
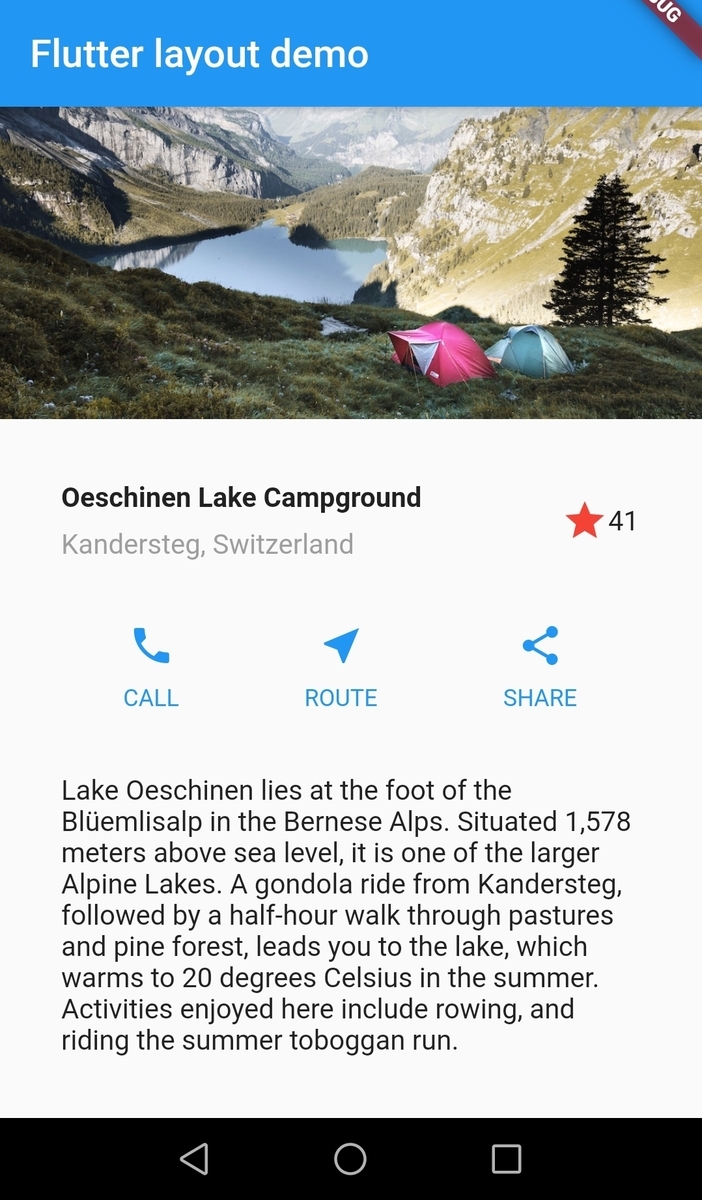
Step 5: Implement the image section
画像を貼り付けます。
プロジェクトフォルダのルートにimagesディレクトリを作成し、lake.jpgファイルを追加します。
画像の場所は公式ページにリンクがあります。
pubspec.yamlに以下を追記。
flutter:
  uses-material-design: true
  assets: # 追記
    - images/lake.jpg # 追記
main.dartのbodyに追記。
import 'package:flutter/material.dart';

void main() => runApp(MyApp());

class MyApp extends StatelessWidget {
  @override
  Widget build(BuildContext context) {
    Widget titleSection = Container(
      padding: const EdgeInsets.all(32),
      child: Row(
        children: [
          Expanded(
            child: Column(
              crossAxisAlignment: CrossAxisAlignment.start,
              children: [
                Container(
                  padding: const EdgeInsets.only(bottom: 8),
                  child: Text(
                    'Oeschinen Lake Campground',
                    style: TextStyle(
                      fontWeight: FontWeight.bold,
                    ),
                  ),
                ),
                Text(
                  'Kandersteg, Switzerland',
                  style: TextStyle(
                    color: Colors.grey[500],
                  ),
                ),
              ],
            ),
          ),
          Icon(
            Icons.star,
            color: Colors.red[500],
          ),
          Text('41'),
        ],
      ),
    );

    Color color = Theme.of(context).primaryColor;
    Widget buttonSection = Container(
      child: Row(
        mainAxisAlignment: MainAxisAlignment.spaceEvenly,
        children: [
          _buildButtonColumn(color, Icons.call, 'CALL'),
          _buildButtonColumn(color, Icons.near_me, 'ROUTE'),
          _buildButtonColumn(color, Icons.share, 'SHARE'),
        ],
      ),
    );

    Widget textSection = Container(
      padding: const EdgeInsets.all(32),
      child: Text(
        'Lake Oeschinen lies at the foot of the Blüemlisalp in the Bernese '
            'Alps. Situated 1,578 meters above sea level, it is one of the '
            'larger Alpine Lakes. A gondola ride from Kandersteg, followed by a '
            'half-hour walk through pastures and pine forest, leads you to the '
            'lake, which warms to 20 degrees Celsius in the summer. Activities '
            'enjoyed here include rowing, and riding the summer toboggan run.',
        softWrap: true,
      ),
    );

    return MaterialApp(
      title: 'Flutter layout demo',
      home: Scaffold(
        appBar: AppBar(
          title: Text('Flutter layout demo'),
        ),
        body: Column(
          children: [
            Image.asset( // 追加
              'images/lake.jpg',
              width: 600,
              height: 240,
              fit: BoxFit.cover,
            ),
            titleSection,
            buttonSection,
            textSection,
          ]
        )
      ),
    );
  }

  Column _buildButtonColumn(Color color, IconData icon, String label) {
    return Column(
      mainAxisSize: MainAxisSize.min,
      mainAxisAlignment: MainAxisAlignment.center,
      children: [
        Icon(icon, color: color),
        Container(
          margin: const EdgeInsets.only(top: 8),
          child: Text(
            label,
            style: TextStyle(
              fontSize: 12,
              fontWeight: FontWeight.w400,
              color: color,
            ),
          ),
        ),
      ],
    );
  }
}

Step 6: Final touch
画面より大きくなってしまったので、スクロールできるようにします。
bodyのColumnをListViewにします。
コードはGistに貼り付けています。
Flutter official tutorial, Layout tutorial
まとめ
ウイジェットに慣れていないので難しく感じます。 次回も続きをしながら、アプリ開発を進めます。